Connecting to a Virtual Server OS through an SSL-VPN Connection
This section describes the procedure for building a network environment that allows you to log in to a virtual server through an SSL-VPN connection.
Before you begin
To create an environment for an SSL-VPN connection, prepare the following items for server and client use, respectively. The file names below should be read as the names of the files that you created.
-
For server use
- Certification Authority certificate (ca.crt)
- Server certificate (server.crt)
- Server private key (server.key)
- DH private key (dh2048.pem)
-
For client use
- Certificate Authority certificate file (ca.crt, shared for server use)
- Client certificate (client_001.crt)
- Client private key (client_001.key)
About this task
Follow the steps below to build an SSL-VPN connection environment and log in to the OS of the virtual server. If necessary, adjust the value for each resource according to the system you use.
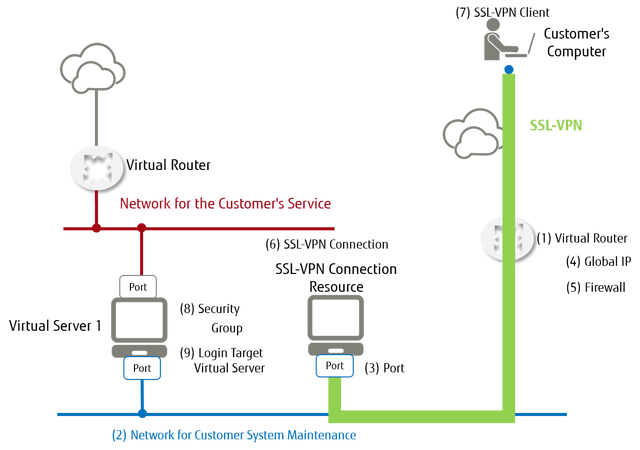
Figure: Building an SSL-VPN environment
Procedure
-
Obtaining a global IP address
Obtain a global IP address from an external network that is in the same availability zone as the virtual server that you want to connect.
Table 1. Example Settings Item Value External Network ID ID of 'inf_az1_ext-net01' Availability Zone Name jp-west-2a Tip: If you cannot obtain a global IP address on the specified external network, select another external network and try again. -
Creating a virtual network for SSL-VPN
Table 2. Example Settings Item Value Availability Zone Name jp-west-2a Virtual Network Name SSL-VPN_Network -
Creating a subnet for SSL-VPN
Create a subnet in the virtual network for SSL-VPN that you created.
Table 3. Example Settings Item Value Subnet Name SSL-VPN_Subnet Virtual Network ID ID of 'SSL-VPN_Network' IP Version IPv4 Network Address Range 172.18.1.0/24
Note: Use a prefix length of 16 - 29 bits.Gateway Address 172.18.1.1
Note: Make sure that you specify the IP address of the port of the virtual router for SSL-VPN. Do not delete this after it has been specified.DHCP true Availability Zone Name jp-west-2a DNS Server 133.162.145.9
133.162.145.10
Host Root CIDR : 192.168.1.0/24
Destination IP Address : 172.18.1.1
-
Creating a virtual router for SSL-VPN
Table 4. Example Settings Item Value Virtual Router Name SSL-VPN_Router Availability Zone Name jp-west-2a -
Setting up a gateway for the virtual router for SSL-VPN
Change the following information of the SSL-VPN virtual router that you created.
Table 5. Example Settings Item Value External Network ID ID of 'inf_az1_ext-net01' -
Connecting the virtual router for SSL-VPN to the subnet
Update the setting information of the virtual router for SSL-VPN, and then connect to the subnet for SSL-VPN. For details, refer to "Changing the information of a virtual router (attaching to a subnet)" in the "API User Guide".
Table 6. Example Settings Item Value Virtual Router ID ID of 'SSL-VPN_Router' Subnet ID ID of 'SSL-VPN_Subnet' -
Creating firewall rules for SSL-VPN
Create rules to allow certain traffic and to block other, based on the conditions under which traffic can pass through to the OS.
Table 7. Example Settings for Allowing Traffic Item Value Name of Firewall Rule SSL-VPN_FW_rule01_tcp22 Protocol tcp Source IP Address 192.168.1.0/24 Source Port Number 1:65535 Destination IP Address 0.0.0.0/0 Destination Port Number 22
Tip: Specify '3389' for Windows RDP connectionActions allow Availability Zone Name jp-west-2a Table 8. Example Settings for Blocking Traffic Item Value Name of Firewall Rule SSL-VPN_FW_rule_all_deny Actions deny Availability Zone Name jp-west-2a -
Creating a firewall policy for SSL-VPN
Compile the firewall rules that you created into a firewall policy.
Table 9. Example Settings Item Value Firewall Policy Name SSL-VPN_Firewall_Policy List of Firewall Rules Specify the following IDs that represent firewall rule lists that you created:
- ID of 'SSL-VPN_FW_rule01_tcp22'
- ID of 'SSL-VPN_FW_rule_all_deny'
Availability Zone Name jp-west-2a -
Creating a firewall for SSL-VPN
Create a firewall by associating the created firewall policy with the virtual router for SSL-VPN.
Table 10. Example Settings Item Value Firewall Name SSL-VPN_Firewall Firewall Policy ID ID of 'SSL-VPN_Firewall_Policy' Virtual Router ID ID of 'SSL-VPN_Router' Availability Zone Name jp-west-2a -
Registering a Certificate Authority certificate for SSL VPN
Use the key management service to register the Certificate Authority certificate.
Table 11. Example Settings Item Value Key Metadata Name ca Confidential Information (payload) -----BEGIN CERTIFICATE-----\n (character string where the line break codes in the payload of ca.crt are replaced with '\n') \n-----END CERTIFICATE----- Content Type for Confidential Information text/plain Retention Period 2025-12-31T23:59:59 -
Registering a server certificate for SSL VPN
Use the key management service to register the server certificate.
Table 12. Example Settings Item Value Key Metadata Name server_certificate Confidential Information (payload) -----BEGIN CERTIFICATE-----\n (character string where the line break codes in the payload of server.crt are replaced with '\n') \n-----END CERTIFICATE----- Content Type for Confidential Information text/plain Retention Period 2025-12-31T23:59:59 -
Registering the server's private key for SSL-VPN
Use the key management service to register the server's private key.
Table 13. Example Settings Item Value Key Metadata Name server_key Confidential Information (payload) -----BEGIN PRIVATE KEY-----\n (character string where the line break codes in the payload of server.key are replaced with '\n') \n-----END PRIVATE KEY----- Content Type for Confidential Information text/plain Retention Period 2025-12-31T23:59:59 -
Registering a DH private key for SSL-VPN
Use the key management service to register a DH private key.
Table 14. Example Settings Item Value Key Metadata Name dh Confidential Information (payload) -----BEGIN DH PARAMETERS-----\n (character string where the line break codes in the payload of dh2048.pem are replaced with '\n') \n-----END DH PARAMETERS----- Content Type for Confidential Information text/plain Retention Period 2025-12-31T23:59:59 -
Creating a key metadata container for SSL-VPN
Create a key metadata container for the four certificates and private keys that you created in the above procedures.
Table 15. Example Settings Item Value Key Metadata Container Name SSL-VPN_VPNCredential Key Metadata Type generic Key Metadata List Specify as a list of objects with the following elements:
-
'name': Specify all of the following key metadata as the name
- For a Certification Authority certificate: ca
- For a server certificate: server_certificate
- For a server private key: server_key
- For a DH private key: dh
- 'secret_ref': Specify the value of 'secret_ref,' generated when the key metadata was created
Example Settings of a Key Metadata List
{ "name": "SSL-VPN_VPNCredential", "type": "generic", "secret_refs": [ { "name": "ca", "secret_ref": "https://keymanagement.jp-west-2.cloud.global.fujitsu.com/v1/{Project ID}/secrets/{ID of Certificate Authority certificate key metadata}" }, { "name": "server_certificate", "secret_ref": "https://keymanagement.jp-west-2.cloud.global.fujitsu.com/v1/{Project ID}/secrets/{ID of server certificate key metadata}" }, { "name": "server_key", "secret_ref": "https://keymanagement.jp-west-2.cloud.global.fujitsu.com/v1/{Project ID}/secrets/{ID of server private key metadata}" }, { "name": "dh", "secret_ref": "https://keymanagement.jp-west-2.cloud.global.fujitsu.com/v1/{Project ID}/secrets/{ID of DH private key metadata}" } ] } -
-
Setting up a VPN service for SSL-VPN
Set up a VPN service that connects to the SSL-VPN subnet via the SSL-VPN virtual router.
Table 16. Example Settings Item Value Name of VPN Service SSL-VPN_Service Subnet ID ID of 'SSL-VPN_Subnet' Virtual Router ID ID of 'SSL-VPN_Router' admin_state_up true Availability Zone Name jp-west-2a -
Setting up an SSL-VPN connection
Set up an SSL-VPN connection by associating the created VPN service for SSL-VPN with the key metadata container for SSL-VPN.
Table 17. Example Settings Item Value Name of SSL-VPN Connection SSL-VPN_Connection Client Address Pool 192.168.1.0/24 Key Metadata Container ID ID of 'SSL-VPN_VPNCredential' VPN Service ID ID of 'SSL-VPN_Service' Protocol tcp Global IP ID of 'Global IP Address' Availability Zone Name jp-west-2a Tip:IP addresses in the client address pool are consumed based on the following formula.
Amount of consumed IP addresses = The number of VPN clients x 4 + 8 (8 are consumed by the VPN server)
Specify a subnet prefix value in the range of 16 - 29.
However, when the prefix value is 29, the above formula will not be applied, and only one client can be connected.
-
Setup of the client environment for the SSL-VPN connection
To set up the client for the SSL-VPN connection, refer to the relevant section in the appendix.
After setting up the client environment, check whether you can successfully connect through SSL-VPN.
-
Connecting the virtual server to the virtual network for SSL-VPN
After setting up an environment where SSL-VPN connection is available, connect or create a virtual server in 'SSL-VPN virtual network.'
Note: When you connect an existing virtual server to 'SSL-VPN virtual network,' you need to add a port. Log in to the virtual server from the existing network, and then adjust the network adapter settings of the OS according to the IP address of the added port. -
Logging in to the OS
Log in to the OS of the virtual server via the SSL-VPN connection, using SSH or remote desktop protocol.
Tip: If you are unable to connect, check the settings of 'Firewall rules for SSL-VPN' to verify whether communication for OS login is allowed.