How to Use NAS Software Image

This section explains how to configure the settings that are required in order to create an NAS software image in the customer's environment and make it available.

Before you begin

In order to create and use the NAS in your user environment, you must create the following resources within the project to which the user belongs in advance:

  • Network and subnet
  • Virtual router that connects to the above network

    Note: Configure the routing, security group, and firewall correctly so that communication is possible between the subnets in which the NAS server was created.
  • SSH key pair to be set for the virtual server
  • Network connector and connector endpoint

    Tip: Required only in configuration across the availability zones.

About this task

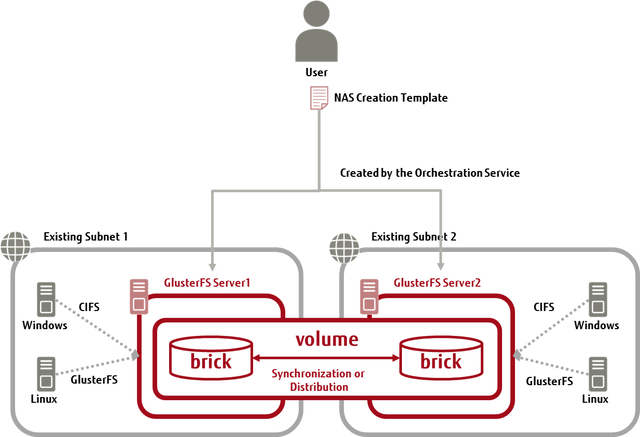
This section describes the procedure for the creation of the NAS image using the template provided by the orchestration service and configuring it to be accessed as NAS. The structure of the system that is created is as shown in the figure below.

Figure: Creation of a NAS Image by Using the Template


Procedure

  1. Prepare the NAS creation template file "glusterfs_nas_YYYYMMDD.yaml."
    Tip: Obtain the NAS creation template file 'glusterfs_nas_YYYYMMDD.yaml' from the service desk.
  2. Specify the contents of the NAS creation template file for the template parameter for the stack creation function provided by the orchestration service.
    Tip: If the NAS creation template can be accessed by URL, specify the URL for the template_url parameter.

    The parameters below are set for the template. Specify the values for the parameters according to the environment in use.

    Table 1. List of NAS Creation Template Parameters
    Parameter Contents Specified (Value)
    nas1_name Virtual server name of GlusterFS Server1
    nas1_keypair_name Key pair name of GlusterFS Server1
    nas1_network Creation destination network ID for GlusterFS Server1
    nas1_subnet Creation destination subnet ID for GlusterFS Server1
    nas1_subnet_cidr Range of addresses of the above subnet (in CIDR notation)
    nas1_availability_zone Creation destination availability zone name of GlusterFS Server1
    nas2_name Virtual server name of GlusterFS Server2
    nas2_keypair_name Key pair name of GlusterFS Server2
    nas2_network Creation destination network ID for GlusterFS Server2
    nas2_subnet Creation destination subnet ID for GlusterFS Server2
    nas2_subnet_cidr Range of addresses of the above subnet (in CIDR notation)
    nas2_availability_zone Creation destination availability zone name of GlusterFS Server2
    flavor Server type in use by GlusterFS Server1/2
    storage_size

    Size of the block storage (brick) to be attached to GlusterFS Server1/2

    Tip: The size that you specify here will be used as the volume for the NAS.
    Important: As additional storage of the size specified here is attached to both GlusterFS Server1/2, the storage charges are doubled.
    storage_type

    Selection for a type of block storage

    • Standard (type M1)
    client_cidr

    Specify in CIDR notation the network address of the subnet where the client to be permitted access to the NAS is created.

    Tip: With the NAS creation template, create a security group to be permitted to connect from the network address specified for this parameter and set it on GlusterFS Server1/2.
  3. Create a stack.

    Wait for creation to be complete, while checking the progress of creation of the stack. When creation of the stack is complete, information such as that below can be referred to as fields that are output.

      GlusterFS Commands: 
        description: gluster Command 
        value: |
          * Display the status of peers. 
            gluster peer status 
    
          * Display information about all volumes, or the specified volume. 
            gluster volume info vol01 
            gluster volume status vol01 
    
          * Start the specified volume. 
            gluster volume start vol01 
    
          * Stop the specified volume. 
            gluster volume stop vol01 
    
          * GlusterFS service Logs and locations 
            glusterd: /var/log/glusterfs/etc-glusterfs-glusterd.vol.log 
            bricks  : /var/log/glusterfs/bricks/bricks-vol01.log 
    
          more information see http://gluster.readthedocs.org/en/latest/ 
    
      mount: 
        description: How to mount 
        value: |
          * glusterfs 
            mount -t glusterfs IPADDRESS:/vol01 /mnt/MOUNTDIR 
          * cifs 
            \\IPADDRESS\Share

Results

The NAS you created is now in operation.

Note:
  • Do not create multiple NAS servers in the same project using the NAS creation template file.
  • The host names defined in the NAS deployment template file (nas1, nas2) cannot be changed.

What to do next

To access the NAS server, you must perform either of the following on the client:

  • Installation and setup of GlusterFS client
  • Setup of sharing in Windows
Note: Do not access the NAS server using NFS protocol.
  • For Linux OS

    Note: Use GlusterFS client version 3.7.X (X represents 13 or later). When you upgraded the NAS server version, also upgrade the client version.

    A user with administrator (root) privileges must perform the following operations:

    1. If glusterfs is installed, uninstall glusterfs.

      # yum remove glusterfs-server 
      # yum remove glusterfs-client
    2. If the glusterfs repository exists in the yum repository, delete it.

      How to check: Execute "yum repolist all" to check whether the glusterfs repository exists.

      How to delete: Delete the file in which the glusterfs repository is set from the /etc/ yum.repos.d directory or move to a different directory.

    3. Register the repository.

      Note: The following is an example of command execution. Depending on the version of GlusterFS being installed, the URL of the repository differs.
      # wget https://download.gluster.org/pub/gluster/glusterfs/old-releases/3.7/LATEST/EPEL.repo/glusterfs-epel.repo -P /etc/yum.repos.d 
      # yum clean all 
      # yum search glusterfs 
      # yum -y install glusterfs-client
    4. Add the following settings to /etc/hosts:

      IPADDRESS nas1 
      IPADDRESS nas2

      In "IPADDRESS," specify the private IP address of nas1/nas2 server. Check the private IP address in the portal screen or the API execution results.

    5. Create the directory to be used for mount destination.

      # mkdir /mnt/MOUNTDIR

      In "MOUNTDIR," specify a directory.

    6. Mount the NAS server.

      # mount -t glusterfs IPADDRESS:/vol01 /mnt/MOUNTDIR
      Note: To the -t option of the mount command, specify "glusterfs." Do not specify "cifs."
    7. For details about other additional settings such as security, refer to the GlusterFS website1.
  • For Windows

    A user with administrator (Administrator) privileges must perform the following operations:

    1. From the Start menu, click All Programs > Accessories > Run and enter the following string in the [Open] box to connect.

      \\IPADDRESS\Share

      In "IPADDRESS," specify the private IP address of nas1/nas2 server. Check the private IP address in the portal screen or the API execution results.

    2. For details about other additional settings such as security, refer to the Samba website2.
Note: If you stop two synchronized NAS servers at the same time, and then start them up again, the client may not be able to connect to one of the NAS servers. If this happens, reboot the NAS server that the client cannot connect to.