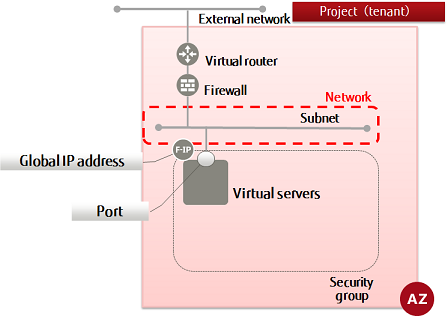
Creating a network
This section explains how to create a network within a project for the deployment of resources such as a virtual server.
You can create multiple networks within a project.
-
Set the environment variable below as follows:
$ NW_NAME=<newNetworkName>(any)
$ AZ=<availabilityZoneName>
-
Execute the following API:
$ curl -Ss $NETWORK/v2.0/networks -X POST \
-H "X-Auth-Token: $OS_AUTH_TOKEN" -H "Content-Type: application/json" \
-d '{"network":{ "name": "'$NW_NAME'", "availability_zone": "'$AZ'"}}' \
| jq .
The following response is output:
{
  "network": {
    "status": "ACTIVE",
    "subnets": [],
    "name": "<specifiedNetworkName>",
    "admin_state_up": true,
    "tenant_id": "<projId>",
    "shared": false,
    "id": "<newNetworkId>",
    "availability_zone": "<specifiedAvailabilityZone>"
  }
}
For the availability zones, AZ1 is expressed as "jp-east-1a", and AZ2 is expressed as "jp-east-1b".
-
Execute the following API to confirm that the network was created properly.
$ curl -Ss $NETWORK/v2.0/networks -X GET \
-H  "X-Auth-Token: $OS_AUTH_TOKEN" | jq .
If a list including the network name that you specified is output, as follows, that means the network was created successfully.
The network names "inf_az1_ext_net01" and "inf_az2_ext_net01" are external networks that exist by default.
{
  "networks": [
    {
      "status": "ACTIVE",
      "subnets": [
        "5079f324-5db0-44ee-92ac-3a6b7977b23f",
        "a56b6058-0479-43a1-8b27-01c1c05e96a2",
        "c1da3ee7-51c3-4801-bb97-aa03a4383ef0",
        "e96e55b8-84bb-4777-a782-a5d6e8340039",
        "f5e9ec37-88ec-494b-ac55-dae101a54cc1"
      ],
      "name": "inf_az2_ext-net01",
      "router:external": true,
      "tenant_id": "31ceb599e8ff48aeb66f2fd748988960",
      "admin_state_up": true,
      "shared": true,
      "id": "375c49fa-a706-4676-b55b-2d3554e5db6a",
      "availability_zone": "jp-east-1b"
    },

    ...

    {
      "status": "ACTIVE",
      "subnets": [],
      "name": "<networkName>",
      "router:external": false,
      "tenant_id": "<projId>",
      "admin_state_up": true,
      "shared": false,
      "id": "<networkId>",
      "availability_zone": "<availabilityZone>"
    },
    {
      "status": "ACTIVE",
      "subnets": [
        "37ca5225-6ca6-4ee6-a49d-d479400a632b",
        "3c2419a7-7745-452c-bee5-664db03129bb",
        "7c7feecd-082c-415b-865a-82d4e5de97e5",
        "d96cdd6c-6e1e-4331-9c8e-42b52588b767",
        "ff4a9bd6-37be-4c03-9b87-1f693f807b48"
      ],
      "name": "inf_az1_ext-net01",
      "router:external": true,
      "tenant_id": "31ceb599e8ff48aeb66f2fd748988960",
      "admin_state_up": true,
      "shared": true,
      "id": "af4198a9-b392-493d-80ec-a7c6e5a1c22a",
      "availability_zone": "jp-east-1a"
    }
  ]
}
Create a subnet for the network you created, to deploy resources such as a virtual server.