This section explains how to create a firewall policy to bind multiple firewall rules.
Rules are prioritized according to their sequence in the list, they are then verified sequentially from the top of the list, and communication permission is controlled.
Tip: A "DENY ALL" rule is automatically added to the end of the policy. This ensures that all traffic without a permission rule defined will be intercepted by default. (Whitelist method) However, it becomes implicit, and does not appear in the policy.
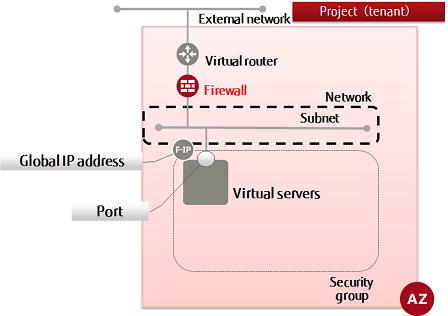
The firewall service settings comprise the following elements, with the filtering information being configured in number order. By associating a firewall with a virtual router, the specified filtering will be performed.
- Create firewall rules
- Create a firewall policy and register rule groups
- Specify a policy, create a firewall, and associate it with the virtual router
-
Execute the following API to retrieve a list of the firewall rules:
$ curl -X GET -Ss $NETWORK/v2.0/fw/firewall_rules \
-H "X-Auth-Token: $OS_AUTH_TOKEN" | jq '.firewall_rules[] | .name, .id'
A list of the firewall rules is displayed in a format such as that below. Select the rules you require for the policy from this list.
...

"<firewallRuleName>"
"<firewallRuleId>"

...
-
Set the environment variables below as follows:
$ NAME=<firewallPolicyName> (any)
$ FWR1=<firewallRuleId1>
$ FWR2=<firewallRuleId2>
$ FWR3=<firewallRuleId3>
Note: Specify as many firewall rule IDs as required by the firewall policy.
$ AVAILABILITY_ZONE=<availabilityZoneSetInFirewallRules>
-
Execute the following API:
$ curl -X POST -Ss $NETWORK/v2.0/fw/firewall_policies \
-H "X-Auth-Token: $OS_AUTH_TOKEN" -H "Content-Type: application/json" \
-d '{"firewall_policy":{"firewall_rules": [ "'$FWR1'", "'$FWR2'",
 "'$FWR3'", "'<remainingSpecifiedRuleIdEnvVars>'"],
 "name": "'$NAME'", "availability_zone": "'$AVAILABILITY_ZONE'"}}' | jq .
The following response is output: The firewall rule IDs are prioritized according to the sequence order in which they are displayed.
{
  "firewall_policy": {
    "name": "<newFirewallPolicyName>",
    "firewall_rules": [
      "<specifiedFirewallRuleId>(1)",
      "<specifiedFirewallRuleId>(2)",
      ...
      "<specifiedFirewallRuleId>(n)"
    ],
    "tenant_id": "<projId>",
    "audited": false,
    "shared": false,
    "id": "<newFirewallPolicyId>",
    "description": "",
    "availability_zone": "<specifiedAvailabilityZone>"
  }
}
For the availability zones, AZ1 is expressed as "jp-east-1a", and AZ2 is expressed as "jp-east-1b".
-
Execute the following API to check the firewall policy that you created:
$ curl -X GET -Ss $NETWORK/v2.0/fw/firewall_policies \
-H "X-Auth-Token: $OS_AUTH_TOKEN" | jq .
If a list including the firewall policy names that you specified is output, as follows, that means the firewall policies were created successfully.
{
  "firewall_policies": [

      ...

    {
    "name": "<newFirewallPolicyName>",
    "firewall_rules": [
      "<specifiedFirewallRuleId1>",
      "<specifiedFirewallRuleId2>",
      ...
      "<specifiedFirewallRuleIdN>"
    ],
    "tenant_id": "<projId>",
    "audited": false,
    "shared": false,
    "id": "<newFirewallPolicyId>",
    "description": "",
    "availability_zone": "<specifiedAvailabilityZone>"
    },

    ...

  ]
}
When finished creating firewall policies, proceed with creation of a firewall to associate firewall policies with virtual routers.