Creating a firewall rule (IP address specification)

This section explains how to create a firewall rule (IP address specification) to use the firewall service for setting packet filters for virtual routers


Tip: The firewall service settings comprise the following elements, with the filtering information being configured in number order. By associating a firewall with a virtual router, the specified filtering will be performed.

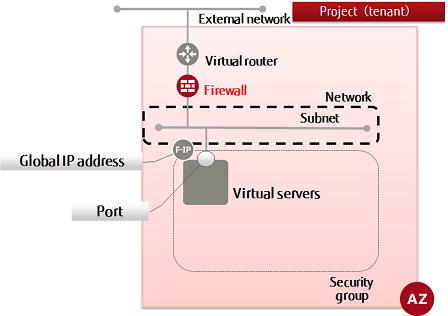
All traffic is intercepted by default (whitelist format), and only traffic that is defined using permission rules (AC=allow) passes through the firewall.

  1. Create firewall rules
  2. Create a firewall policy and register rule groups
  3. Specify a policy, create a firewall, and associate it with the virtual router

Configure the settings as below to create firewall rules.

  • The source or destination IP address
  • The protocol to use for communication
  • The port number to use for communication
  • Whether to allow or deny communication

This item explains how to create specific rules such as those shown below.

  • Allow: Source IP address: TCP
  • Allow: Source IP address: UDP
  • Allow: Source IP address: ICMP

While you can do advanced settings for a firewall, this guide shows how to create commonly used rules. Refer to the Service Specification and API Reference Manual for details on the advanced setting items and how to configure them.

  1. Set the environment variables below as follows:
    $ FWR_NAME=<firewallRuleName> (any)
    $ AC=<accessControl> (allow)
    $ SOURCE_IP=<ipAddressToAllow> (specify using a format such as XXX.XXX.XXX.0/24)
    $ PROTOCOL=<protocol> (specify tcp, udp, icmp)
    $ AVAILABILITY_ZONE=<creationDestinationAvailabilityZoneName>
  2. Execute the following API:
    $ curl -X POST -Ss $NETWORK/v2.0/fw/firewall_rules \
    -H "X-Auth-Token: $OS_AUTH_TOKEN" -H "Content-Type: application/json" \
    -d '{"firewall_rule": { "name": "'$FWR_NAME'" ,
     "action": "'$AC'", "source_ip_address":"'$SOURCE_IP'" ,
     "protocol": "'$PROTOCOL'",
     "availability_zone": "'$AVAILABILITY_ZONE'" }}' | jq .

    The following response is output:

    {
      "firewall_rule": {
        "protocol": "<protocol>",
        "description": "",
        "ip_version": 4,
        "tenant_id": "<projId>",
        "enabled": true,
        "source_ip_address": "<specifiedIpAddr>",
        "destination_ip_address": null,
        "firewall_policy_id": null,
        "action": "allow",
        "shared": false,
        "source_port": null,
        "position": null,
        "destination_port": null,
        "id": "<newFirewallRuleId>",
        "name": "<newFirewallRuleName>",
        "availability_zone": "<specifiedAvailabilityZone>"
      }
    }

    For the availability zones, AZ1 is expressed as "jp-east-1a", and AZ2 is expressed as "jp-east-1b".

  3. Execute the following API to check the firewall rules that you created:
    $ curl -Ss $NETWORK/v2.0/fw/firewall_rules -X GET \
    -H "X-Auth-Token:  $OS_AUTH_TOKEN" | jq  '.firewall_rules[] | .name,.id'

    If a list including the firewall rule names that you specified is output, as follows, that means the firewall rules were created successfully.

    ...
    
    "<newFirewallRuleName>"
    "<newFirewallRuleId>"
    
    ...


When finished creating firewall rules, proceed with creation of a firewall policy to which those rules are bound.