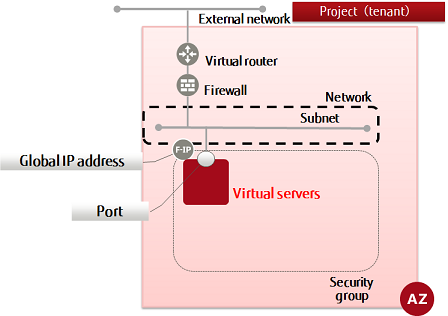
This section explains how to specify a port (private IP address) and create a virtual server (Windows).
Refer to "Creating a virtual server (Windows and DHCP retrieval)" for details on retrieving a port (private IP address) using DHCP.
Follow the procedure below to create a virtual server and obtain a password. A password is required when logging in to the remote desktop.
- Set key pairs for password encryption and decryption, and create a virtual server
- Retrieve the encrypted password
- Use the key pair to decrypt and retrieve the password
DANGER
It is possible for other users to reference the passwords when using a Windows virtual server that has been deployed with admin_pass specified in the metadata, so you should change the password after deployment.
-
Set key pairs for password encryption and decryption, and create a virtual server.
Set the environment variables below as follows:
$ VM_NAME=<virtualServerName> (any)
$ IMAGE_REF_ID=<windowsimgId>
$ FLAVER_ID=<specOfVirtualServer> (listed flavor ID)
$ VOL_SIZE=80
$ DEVICE_NAME=<blockStoragePath> (specify using "/dev/vda" format)
$ SOURCE=<blockStorageType>
$ DESTINATION=<connectionDestinationVol> (specify volume)
$ ISDELETE=<volDeletion> (specify 1 to delete volumes created during creation of the virtual server, or 0 otherwise)
$ KEYNAME=<keyPairName>
$ INSTANCE_MAX=<maxNumOfServers>
$ INSTANCE_MIN=<minNumOfServers>
$ PORT_ID=<portIdToBeSpecified>
-
Execute the following API:
$ curl -Ss $COMPUTE/v2/$PROJECT_ID/servers -X POST \
-H "X-Auth-Token: $OS_AUTH_TOKEN" -H "Content-Type: application/json" \
-d '{"server": {"name": "'$VM_NAME'", "imageRef": "",
 "flavorRef": "'$FLAVER_ID'", "block_device_mapping_v2":
 [ {"boot_index": "0", "uuid":"'$IMAGE_REF_ID'",
 "volume_size": "'$VOL_SIZE'", "source_type": "'$SOURCE'",
 "destination_type": "'$DESTINATION'",
 "delete_on_termination": '$ISDELETE'} ] , "max_count": '$INSTANCE_MAX',
 "min_count": '$INSTANCE_MIN', "key_name":"'$KEYNAME'",
 "networks": [{"port": "'$PORT_ID'"}]} }' | jq .
The following response is output:
{
  "server": {
    "security_groups": [
      {
        "name": "<specifiedSecGroupName>"
      }
    ],
    "OS-DCF:diskConfig": "MANUAL",
    "id": "<newVirtualServerId>",
    "links": [
      {
        "href": "http://10.3.0.201/v2/<projId>/servers/<newVirtualServerId>",
        "rel": "self"
      },
      {
        "href": "http://10.3.0.201/<projId>/servers/<newVirtualServerId>",
        "rel": "bookmark"
      }
    ]
  }
}
-
Execute the following API to check the virtual server that you created:
$ curl -Ss $COMPUTE/v2/$PROJECT_ID/servers/detail -X GET \
-H "X-Auth-Token:  $OS_AUTH_TOKEN" | \
jq '.servers[] | {status:  .status, network_name:  .addresses |
keys, key_name:  .key_name, flavor_id:  .flavor |
.id, vm_id:  .id, security_group:  .security_groups[] |
.name, name:  .name, }'
If a list including the virtual server name that you specified is output, as follows, that means the virtual server was created successfully.
...

{
  "status": "<statusOfVirtualServer>",
  "network_name": [
    "<connectedNetworkName>"
  ],
  "key_name": "<keyPairName>",
  "flavor_id": "<flavorId>",
  "vm_id": "<virtualServerId>",
  "security_group": "<specifiedSecGroupName>",
  "name": "<virtualServerName>"
}

...
-
Retrieve the encrypted password.
After creating the virtual server, the interval before password retrieval can be performed is 10 minutes.
Set the environment variables below as follows:
$ SERVER_ID=<virtualServerId>
$ PROJECT_ID=<projId>
-
Execute the following API:
$ curl -s $COMPUTE/v2/$PROJECT_ID/servers/$SERVER_ID/os-server-password \
-X GET -H "X-Auth-Token:  $OS_AUTH_TOKEN" | jq .
The response will be like the following:
{
  "password": "~~~~  <encryptedPassword>  ~~~~=="
}
-
Use the key pair to decrypt and retrieve the password.
Set the environment variable below as follows:
$ PASSWORD=<retrievedPassword>
-
Execute the following command:
$ echo $PASSWORD | openssl base64 -d -A | openssl rsautl -decrypt -inkey <pathToSpecifiedKeyFile>
