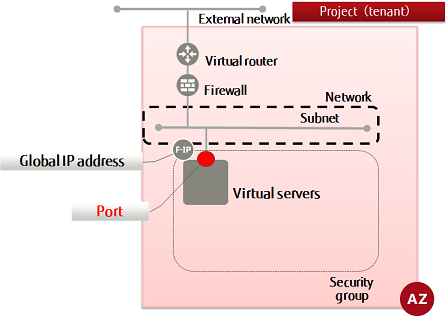
This section explains how to create a port (network interface) to be associated with an IP address, for connecting resources such as virtual servers to a network.
If only the subnet is specified when creating the resources below, the system will automatically create a port and assign an IP address to it.
- Virtual server
Note: To manually specify an IP address instead of having one automatically assigned using DHCP when deploying a virtual server, create a port associated with that IP address in advance, and then assign it to the virtual server.
Tip: You can add multiple ports to a virtual server.
- Virtual router
Note: A port is assigned automatically only when created for a default gateway (x.x.x.1). When adding a virtual router to a network that already has a virtual router connected with the x.x.x.1 address, it is necessary to configure the port manually.
-
Set the environment variables below as follows:
$ PORT_NAME=<portName>(any)
$ NETWORK_ID=<networkId>
$ SUBNET_ID=<subnetId>
$ FIXED_IP_ADDRESS=<ipAddrToBeSpecified> (specify using format "XXX.XXX.XXX.XXX" within a range specified during creation of subnet)
$ SG_ID=<securityGroupId>
-
Execute the following API:
$ curl -Ss $NETWORK/v2.0/ports -X POST \
-H "X-Auth-Token: $OS_AUTH_TOKEN" -H "Content-Type: application/json" \
-d '{"port": {"network_id": "'$NETWORK_ID'", "name": "'$PORT_NAME'",
 "availability_zone": "'$AZ'", "fixed_ips":
 [{"subnet_id": "'$SUBNET_ID'", "ip_address': "'$FIXED_IP_ADDRESS'"}],
 "security_groups": ["'$SG_ID'"]}}' | jq .
The following response is output:
{
  "port": {
    "status": "<status>",
    "name": "<portName>",
    "allowed_address_pairs": [],
    "admin_state_up": true,
    "network_id": "<networkId>",
    "tenant_id": "<projId>",
    "binding:vnic_type": "normal",
    "device_owner": "",
    "mac_address": "<macAddr>",
    "fixed_ips": [
      {
        "subnet_id": "<subnetId>",
        "ip_address": "<ipAddrToBeSpecified>"XXX.XXX.XXX.XXX""
      }
    ],
    "id": "<portId>",
    "security_groups": [
      null
    ],
    "device_id": "",
    "availability_zone": "<availabilityZone>"
  }
}
For the availability zones, AZ1 is expressed as "jp-east-1a", and AZ2 is expressed as "jp-east-1b".
-
Execute the following API to check the port that you created:
$ curl -Ss $NETWORK/v2.0/ports -X GET \
-H "X-Auth-Token: $OS_AUTH_TOKEN" \
| jq '.ports[]| .name, .status, .id, .fixed_ips[]'
If a list including the port name that you specified is output, as follows, that means the port was created successfully.
...

""
"<status>"
"<portId>"
{
  "subnet_id": "<subnetId>",
  "ip_address": "<privateIpAddr>>"
}

...