3.3 FJCS User Management#
3.3.1 Register User Information#
3.3.1.1 Register a New User#
Contractors and administrators can register new users of FJCS Services.
Before Starting#
Log in to the FJCS Portal as a "Contractor" or "Administrator".
Outline#
To register a new user, follow the procedure below.
Procedure#
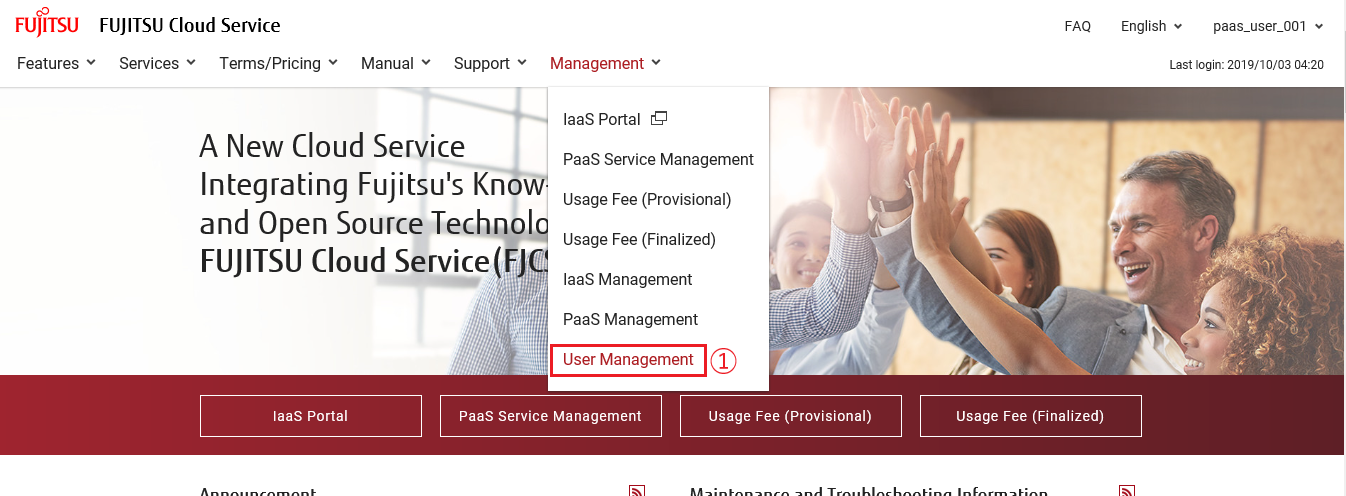
- On the [FJCS Portal] screen, click [User Management] ①.
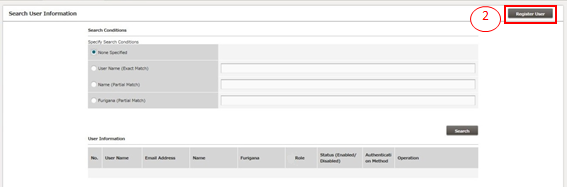
- On the [Search User Information] screen, click the [Register User] button ②.
-
On the [Register User] screen, enter the user information and click the [Register] button ③. To return to the [Search User Information] screen, click the [Back] button ④.
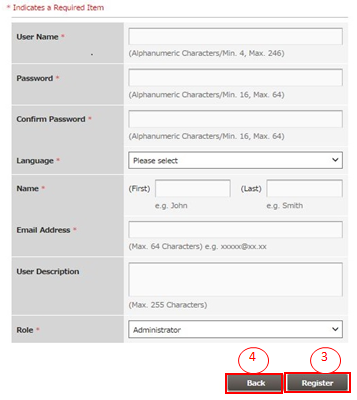
Table 7: Input items for user information registration
Item Name Explanation User Name Enter the new user's user name, considering the input restrictions. Password Enter the new user's password, considering the input restrictions. Language Select the language of the email messages sent from the FJCS Portal. Name (Last, First) Enter the new user's name (last and first names), considering the input restrictions. Email Address Enter the new user's email address, considering the input restrictions. User Description Enter the new user's description, considering the input restrictions. Role (*1) Select the role to associate with the new user.
Once the user information is registered, you can use the [Search User Information] function to make sure that the new user is successfully registered.
*1 The roles on the FJCS Portal are different from those on the IaaS and PaaS Management. The roles on the IaaS Management default to the role of "Member". To change each role, do so on the appropriate portal site. For more information on the roles on the IaaS and PaaS Management, refer to 1.1.2.1, respectively.
3.3.2 Search User Information#
3.3.2.1 Search User Information#
Contractor and administrators can search users of FJCS Services.
Before Starting#
Log in to the FJCS Portal as a "Contractor" or "Administrator".
Outline#
To search user information, follow the procedure below.
Procedure#
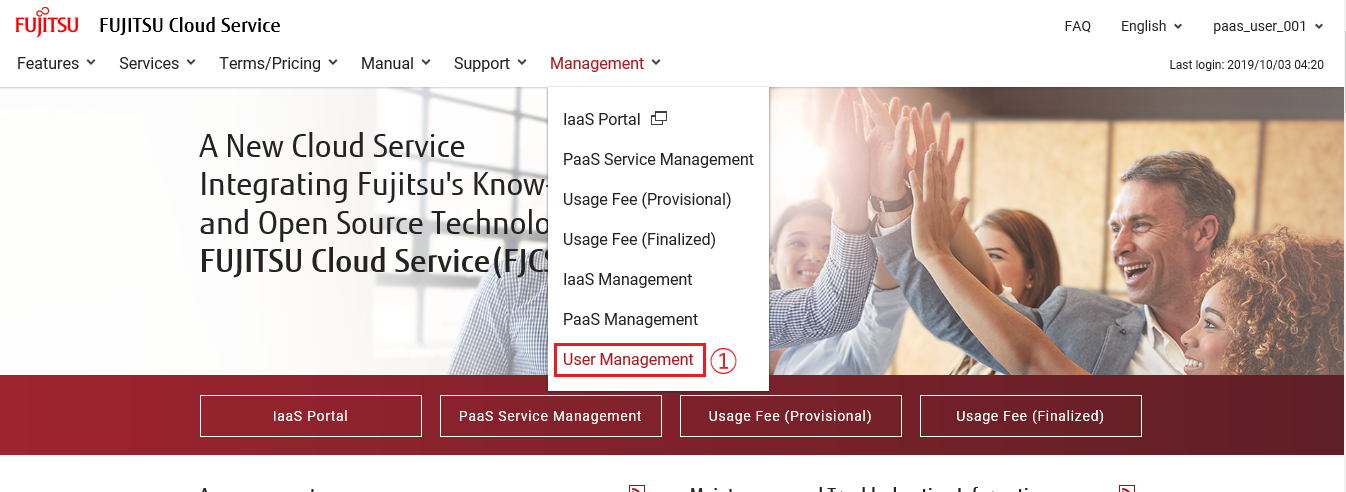
- On the [FJCS Portal] screen, click [User Management] ①.
-
On the [Search User Information] screen, select one of the search condition radio buttons. Enter the search conditions and click the [Search] button ②.

Table 8: Input items to look up a user
Item Name Explanation None Specified Search without specifying search conditions. All of the users will be displayed. User Name (exact match) Returns the user who exactly matches the specified user name. Name (partial match) Returns all users who partially match the specified name. Furigana (partial match) Returns all users who partially match the specified Furigana. -
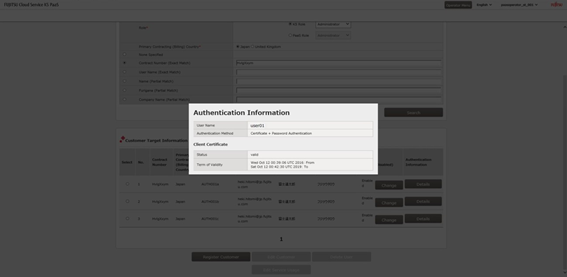
Make sure the users that match the search conditions are displayed. If you want to display the detailed authentication information for a user, click the [Details] button ③ for the particular user.

3.3.3 Refer To, Edit, or Delete User Information#
3.3.3.1 Change User Information#
Contractors and administrators can change other users' information. *Administrators can search contractors’ information but cannot change it.
Before Starting#
Log in as a contractor or administrator and search for the user whose information you want to change.
Outline#
To refer to and edit a user's information, follow the procedure below.
Procedure#
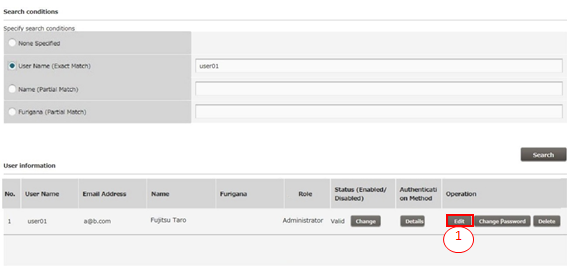
- On the [Search User Information] screen, select the radio button for the user whose information you want to change, and then click the [Edit] button ①.
-
On the [Edit User Information] screen, make sure that the information for the selected user is displayed.
Enter the content of the item(s) you want to change, and then click the [Change] button ②. To return to the [Search User Information] screen, click the [Back] button ③.
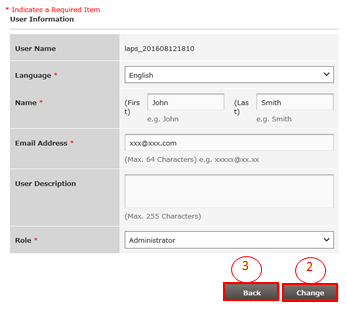
Table 9: Input items for user information modification
Item Name Explanation Language Change the language of the email messages sent from FJCS Portal.
*e.g. email notification to notify password expirationName (Last, First) Change the user's name (last and first names), considering the input restrictions. Email Address Change the user's email address, considering the input restrictions. User Description Change the user's description, considering the input restrictions. Role Change the role associated with the user.
3.3.3.2 Change User Passwords#
Contractors and administrators can forcibly change other users' passwords.
*Administrators can change contractors’ passwords.
**In the event that the password of a user is lost, stolen or leaked or there is a possibility that a third party may illegally use FJCS services due to it, immediately change the password of the user.
Before Starting#
Log in as a contractor or administrator and search for the user or the contractor whose password you want to change.
Outline#
To change a user's or contractor’s password, follow the procedure below.
Procedure#
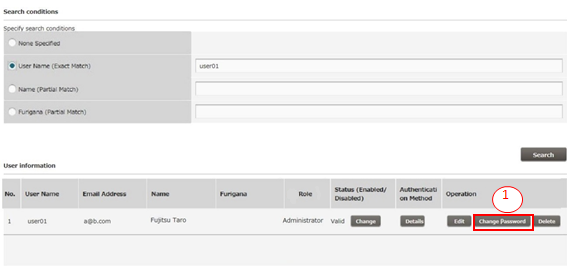
- On the [Search User Information] screen, click the [Change Password] button ① of the user or contractor whose password you want to change.
-
On the [Change User Password] screen, enter the new password and click the [Change] button ②. (*1)
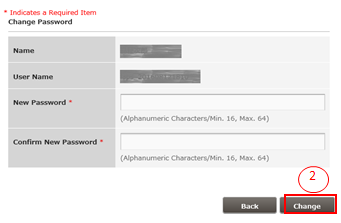
Table 10: Input item for changing user password
Item Name Explanation New Password Enter the user's or the contractor’s new password, considering the input restrictions.
*1 If the password of a user account is updated, the token obtained before the update becomes invalid. Get a new token after the user's password has been changed.
3.3.3.3 Delete a User#
Contractors and administrators can delete other users. *Please be noted that a contractor can delete an administrator, but an administrator cannot delete a contractor.
Before Starting#
Log in as a contractor or administrator and search for the user you want to delete.
Outline#
To delete a user, follow the procedure below.
Procedure#
- On the [Search User Information] screen, click the [Delete] button ① of the user you want to delete. (*1)
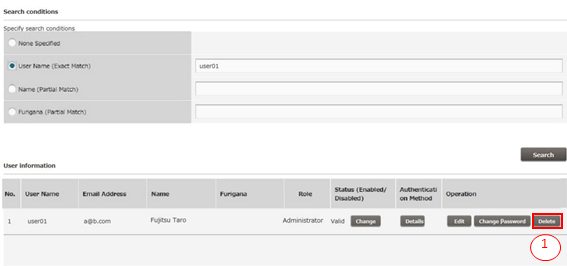
*1 When you are logged on as an administrator, you cannot select and delete your own user account although you are displayed on the [Search User Information] screen. To delete your own user account, ask a contractor or another administrator user to do so.
3.3.3.4 Change User Status#
Contractors and administrators can change the statuses of other users.
Before Starting#
Log in as a contractor or administrator and search for the user whose status you want to change.
Outline#
To change a user's status, follow the procedure below.
Procedure#
- On the [Search User Information] screen, click the [Change] button ① for the user whose status you want to change. (*1)
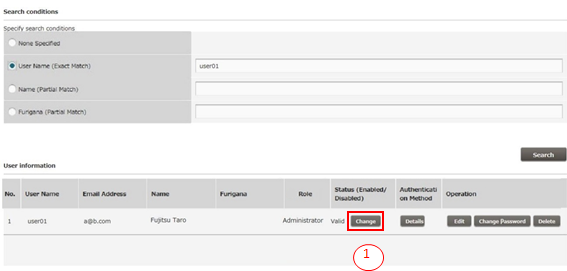
*1 When you are logged in as an administrator, you cannot select your own user account and change its status although you are displayed on the [Search User Information] screen. To change the status of your own user account, ask a contractor or another administrator user to do so.
3.3.4 Refer To and Edit Your Own User Information#
3.3.4.1 Refer To and Edit Your Own User Information#
This section describes how to refer to and edit your own user information when you are logged in to the FJCS Portal.
Before Starting#
Log in as a user registered with the FJCS Portal.
Outline#
To refer to and edit your own user information when you are logged in, follow the procedure below. This procedure assumes that you are logged in as the contractor.
Procedure#
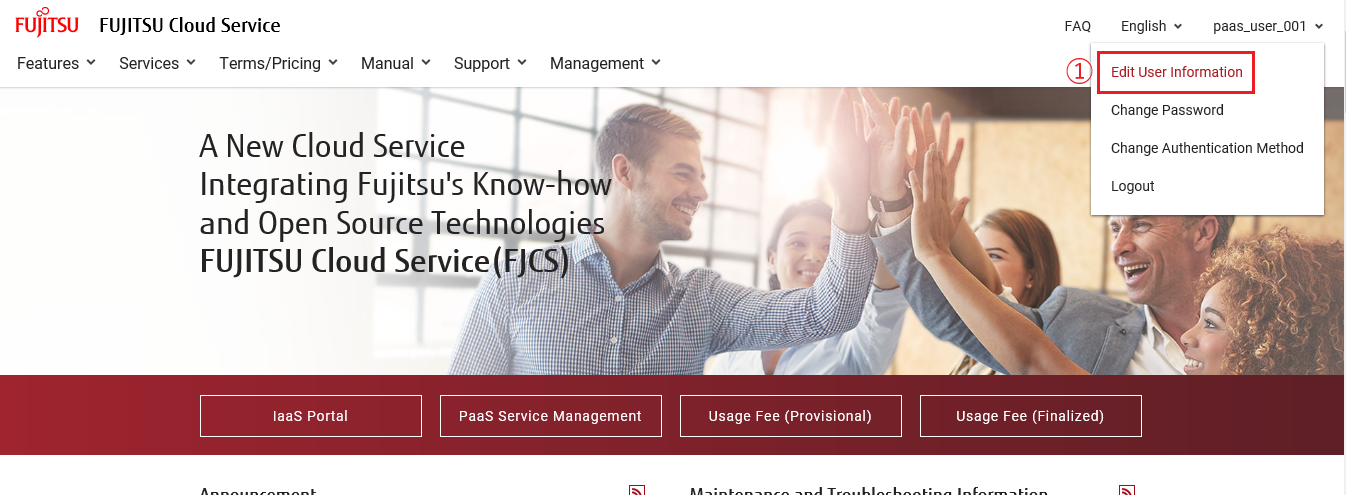
- On the [FJCS Portal] screen, select [Edit User Information] ① from the pull-down menu at the upper right of the screen.
-
On the [Edit User Information] screen, edit the content of the item(s) you want to change, and then click the "Change" button ②. (*1) (*2)
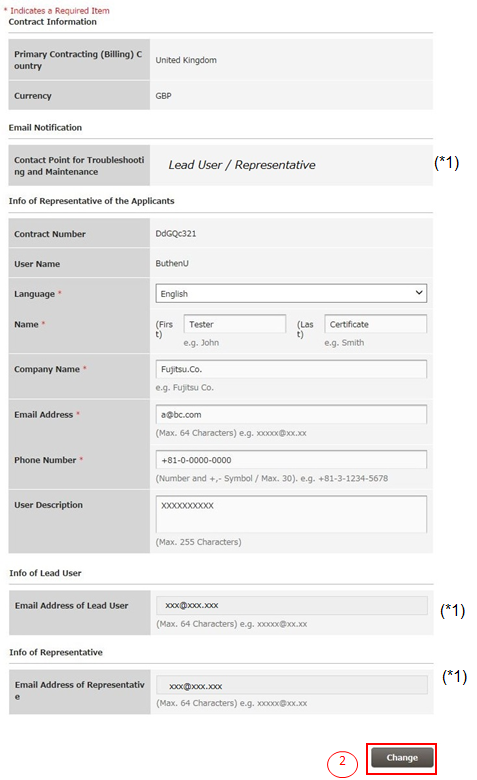
Table 11: Input items to modify your user information
Item Name Explanation Language Select the language of the email messages sent from the FJCS Portal. Name (Last, First) Enter your first and last names*. Company Name Enter the company name* to which the user belongs to. Email Address Enter the user's email address*. Phone Number Enter the user's telephone number*. User Description Enter the user description*.
* Observe the input restrictions when entering each item.
*1
When you are logged in as a contractor, editable items on the "Edit User Information" are limited. You have to submit Change/Cancel applications to change the items you specified at the contract signing stage of FJCS.
*2
When you are logged in as a "User", the "Edit User Information" screen looks like the following. (Administrator or Developer)
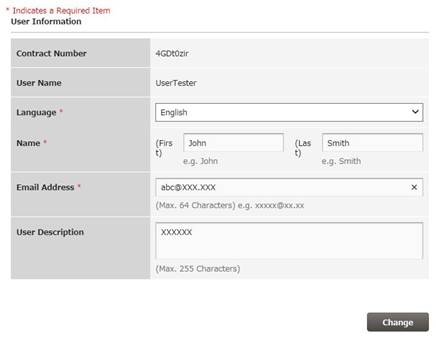
Table 12: Explanation of the user information
| Item Name | Explanation |
|---|---|
| Language | Select the language of the email messages sent from FJCS Portal. |
| Name (Last, First) | Enter your first and last names, considering the input restrictions. |
| Email Address | Enter your email address, considering the input restrictions. |
| User Description | Enter your user description, considering the input restrictions. |
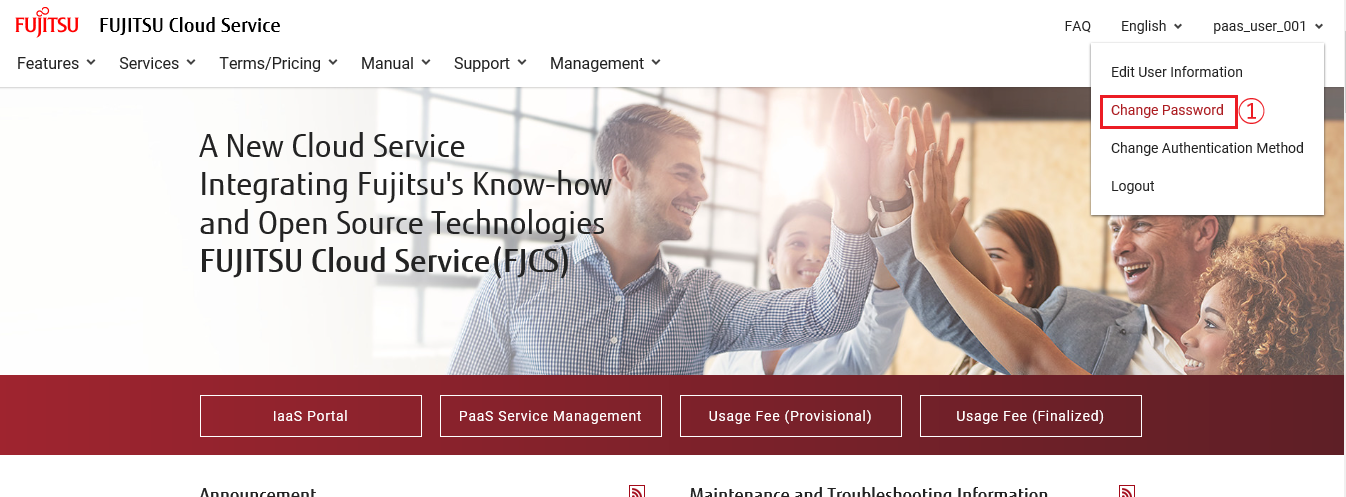
3.3.4.2 Change Your Own User’s Password#
This section describes how to change your own user's password when you are logged in to the FJCS Portal. **In the event that the password of a user is lost, stolen or leaked or there is a possibility that a third party may illegally use FJCS services due to it, immediately change the password of the user.
Before Starting#
Log in as a user registered with the FJCS Portal.
Outline#
To change the logged-in user's password, follow the steps below.
Procedure#
- On the [FJCS Portal] screen, select [Change Password] ① from the pull-down menu at the upper right of the screen.
-
On the [Change Password] screen, enter the current and new passwords, re-enter the new password, and then click the [Change] button ②.
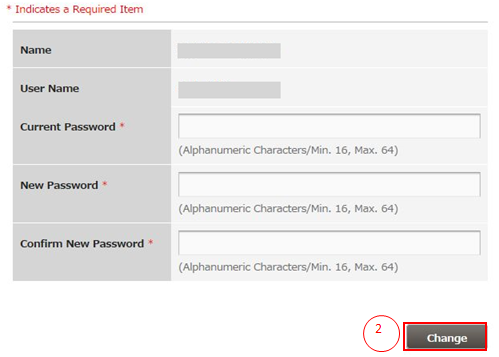
Table 13: Input items to change your password
Item Name Explanation Current Password Enter your current password. New Password Enter your new password, considering the input restrictions.
3.3.5 Change Authentication Method#
3.3.5.1 Issue a Certificate for Authentication#
This section describes how to issue a certificate for the client authentication needed to use the services.
Before Starting#
Log in as a user registered with the FJCS Portal.
Outline#
To issue the client certificate for the logged-in user, follow the procedure below.
Procedure#
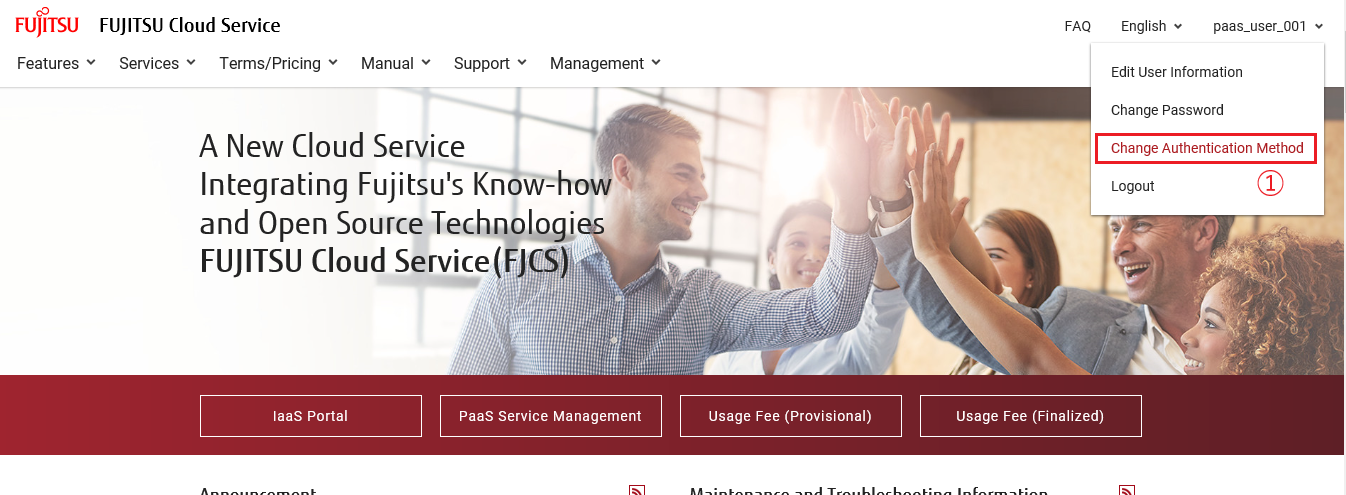
- On the [FJCS Portal] screen, select [Change Authentication Method] ① from the pull-down menu at the upper right of the screen.

- On the [Change Authentication Method] screen, click the [Issue certificate] button ②.
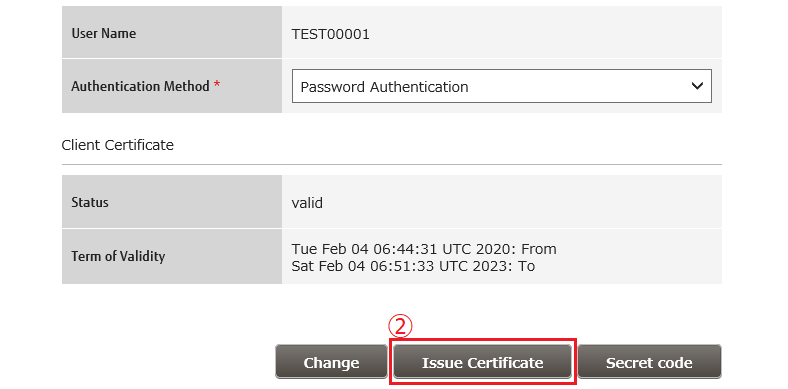
-
On the [Issue Client Certificate] screen, enter a passphrase of your choosing and click the [Apply] button ③. To cancel the issuance of the certificate, click the [Back] button ④.
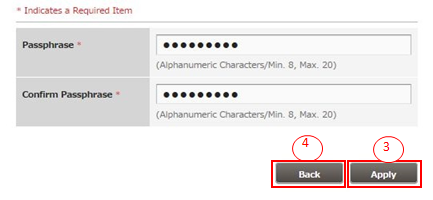
Item Name Explanation Passphrase Enter a passphrase for the certificate that meets the specified criteria. It is important that this passphrase is stored carefully, as it is required in order to obtain and use the certificate. -
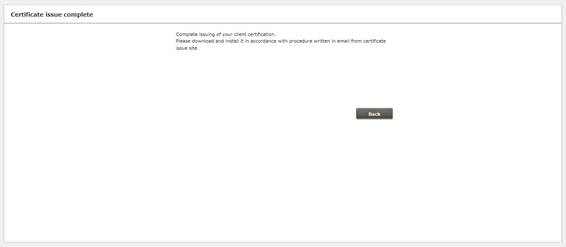
The [Certificate Issue Complete] screen appears and an email notifying you of the URL from which to download the certificate will arrive at the registered email address*. Download the certificate file from the URL shown in the email、and execute it to import the certificate to your browser.(*1)
- It would take somewhere around 1 hour until you receive the email.
*1 Certificates are valid for three years. You will receive a certificate download notification e-mail at the e-mail address registered 30 days before the expiration date. Download a new certificate from the URL in the email and register it in your browser.
3.3.5.2 Issuing of secret code#
We will issue a secret code for users of the service to perform one-time password authentication.
Before Starting#
Log in as the user registered on the FJCS portal.
Outline#
Follow the steps below to issue a secret code for the logged-in user.
Procedure#
1.On the [FJCS Portal] screen, click [Change Authentication Method] ① from the pull-down menu on the upper right.
2.On the [Change Authentication Method] screen, click the [Secret code] ②button.
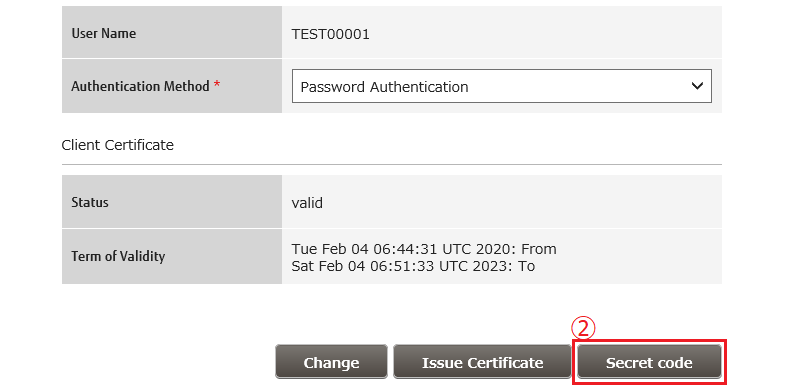
3.A secret code will be issued, and the secret code information and QR Code will be displayed on the [Secret code] screen.
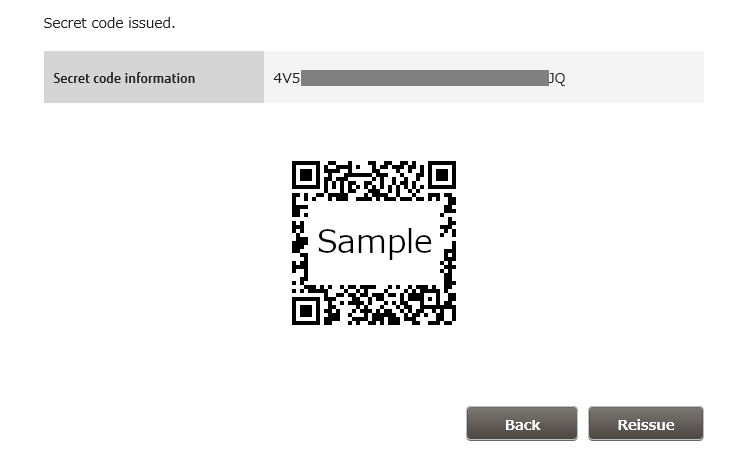
* If the secret code has been issued, the current secret code information and QR Code will be displayed on the [Secret code] screen.
4.Set the issued secret code in the two-step authentication app. Scan the QR Code on the [Secret code] screen with the two-step authentication app, or enter the secret code information into the two-step authentication app to make the settings.
3.3.5.3 Change the User Authentication Method#
This section describes how to change the FJCS authentication method
Before Starting#
Log in to the FJCS portal as a registered FJCS user. If you change to "Certificate + Password Authentication", make sure that the logged-in user has a valid certificate. Also, when changing to "One Time Password + Password Authentication", make sure that the secret code has been issued and that the two-step authentication application has already been set.
Outline#
To change the authentication method for the logged-in user, follow the procedure below. This procedure assumes that you want to change from "Password Authentication" to "Certificate + Password Authentication". The authentication method can be selected from the following combinations.
| Combination | Information to confirm |
|---|---|
| Password Authentication | |
| Certificate + Password Authentication | Certificate |
| One Time Password + Password Authentication | Secret code |
Procedure#
- On the [FJCS Portal] screen, select [Change Authentication Method] ① from the pull-down menu at the upper right of the screen.
- Using the pull-down menu ②, change the authentication method from "Password" to "Certificate + Password Authentication" and then click the "Change" button ③.
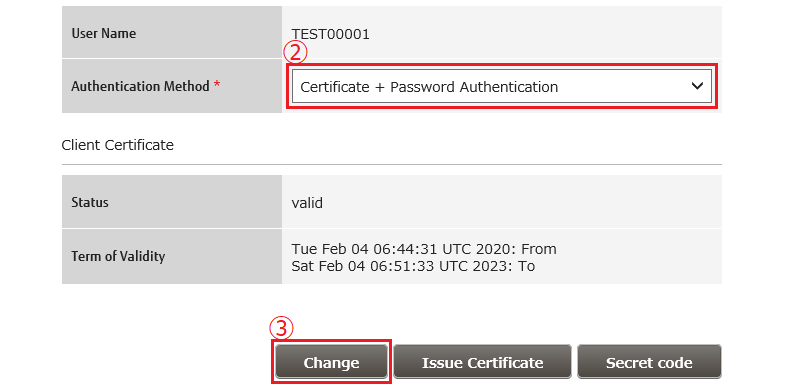
After clicking the 'Change' button, once log out the portal and log in again to take effect.
*When changing from the current authentication method to another combination of authentication methods, replace the contents of this section with the change to each combination and execute.
In case of "One Time Password + Password Authentication", when using IaaS API, it will be authenticated by "Password Authentication".
3.3.6 Reissue a Certificate for Authentication#
3.3.6.1 Reissue a Certificate for Authentication#
This section describes the procedure to reissue a certificate for authentication when you have lost it.
Outline#
To reissue the client certificate, follow the steps below.
Procedure#
- On the [FJCS Portal] screen, click [Support] ① and select [Inquiries] ② from the drop-down menu.
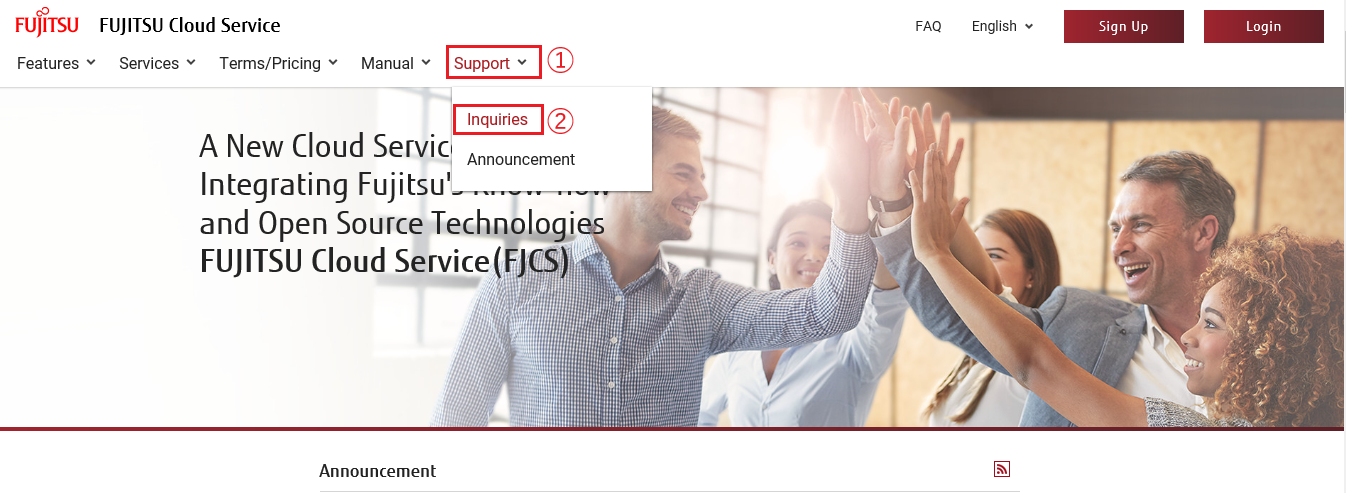
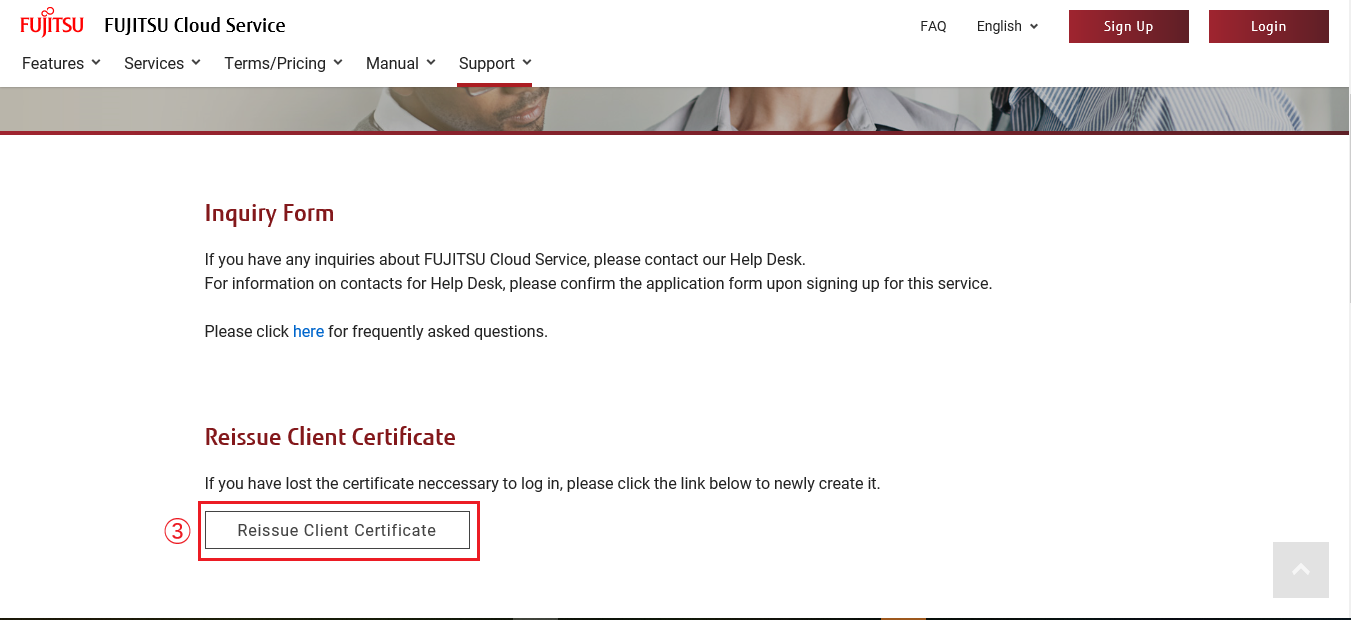
- On the [Inquiries] screen, click [Reissue Client Certificate] ③ button.
-
On the [Reissue Client Certificate] screen, enter the required items and click the [Reissue] button ④. To return to the [FJCS Portal] screen, click the [Back] button ⑤.
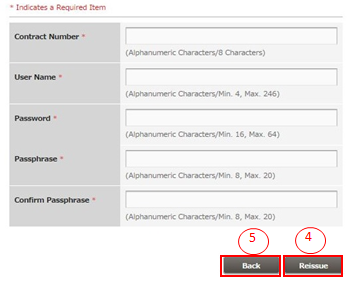
Item Name Explanation Contract number Enter the logged-in user's contract number. User name Enter the logged-in user's user name. Password Enter the logged-in user's password. Passphrase Enter a passphrase for the certificate that meets the specified criteria. It is important that this passphrase is stored carefully, as it is required in order to obtain and use the certificate. -
The [Certificate Issue Complete] screen appears and an email notifying you of the URL from which to download the certificate will arrive at the registered email address*. Download the certificate from the URL shown in the email.
*It would take somewhere around 1 hour until you receive the email. If you do not receive the certificate DL e-mail even after 1 hour since issuing the certificate please contact the help desk.

*After the completion of the procedure to issue a certificate, it might take some time before a reissuance becomes possible. If a reissuance failed, retry it after a lapse of more than an hour since the completion of the issuance procedure.
3.3.7 Install a Certificate#
3.3.7.1 Install a Certificate for Authentication#
This section describes the procedure to install a certificate after issuing it.
Outline#
To install a certificate, follow the steps below. Note that the screen images in this section may be different depending on your device.
Procedure#
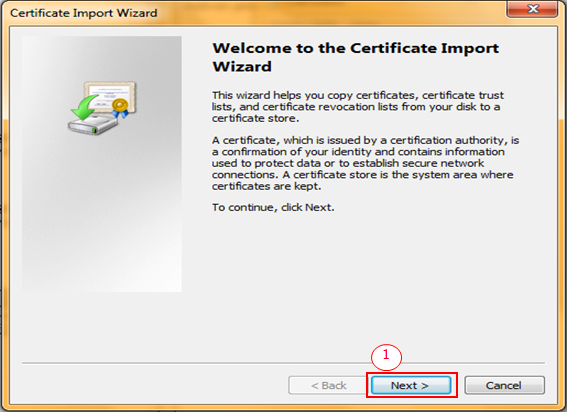
- Double-click the downloaded EndUser.p12 and start the Certificate Import Wizard. Click [Next] ① button.
-
Specify the downloaded EndUser.p12 for File name and click [Next] ② button.
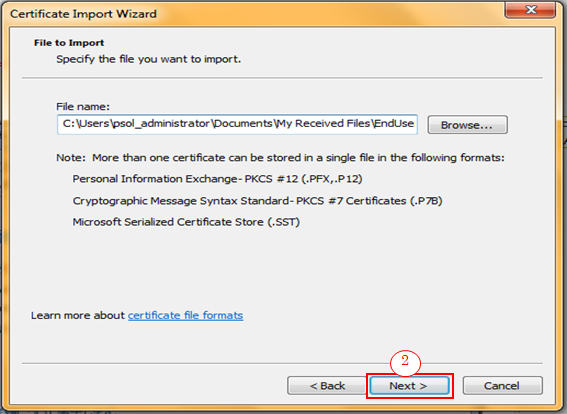
Item Name Explanation File name: Specify the path to the downloaded EndUser.p12. -
On the [Password] screen, enter your passwords, select any necessary options and then click [Next] ③ button.
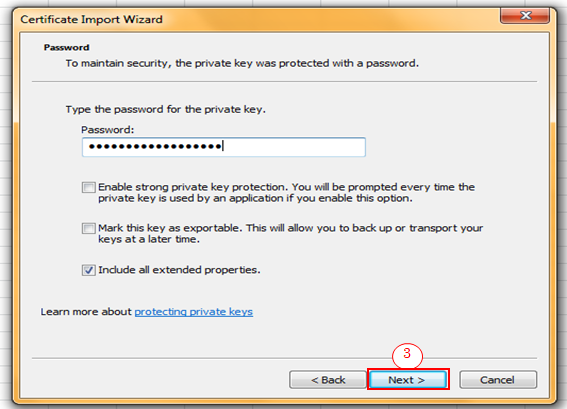
Item Name Explanation Password: Enter the passphrase you created on the [Issue Client Certificate] screen of FJCS Portal. -
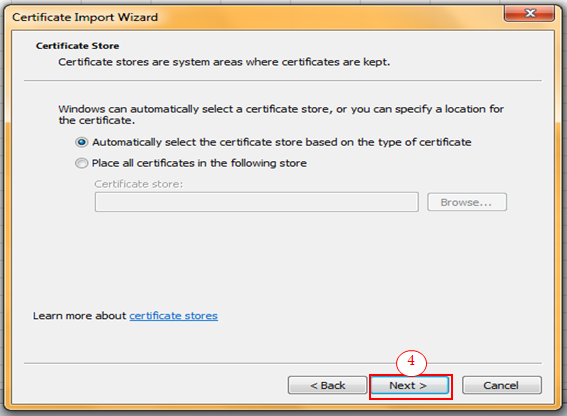
On the [Certificate Store] screen, select [Automatically select the certificate store based on the type of certificate] and click [Next] ④ button.
- To complete the Certificate Import Wizard, click [Finish] ⑤ button.
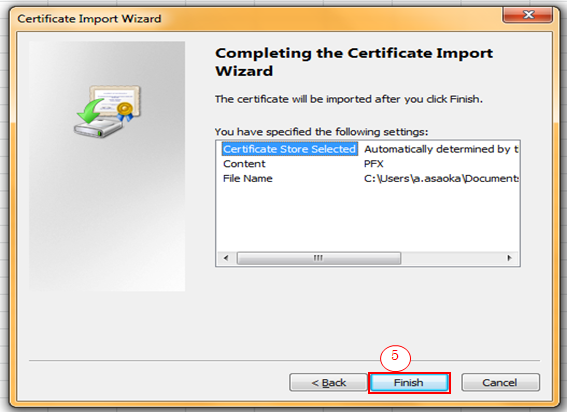
- If the message below is popped up, the certificate is successfully imported. Click [OK] (6) button.

*Display the certificate dialogue from Internet Option and confirm in [Personal] store that the client certificate has successfully been imported. If your web browser is Internet Explorer, you can check where the certificate is stored by going through [Internet options] > [Content] > [Certificates] > [Personal].
3.3.8 Reissue User Passwords#
3.3.8.1 Reissue User Passwords#
This section describes the procedure to reissue user passwords when you have lost them.
Outline#
To reissue user passwords, follow the steps below.
Procedure#
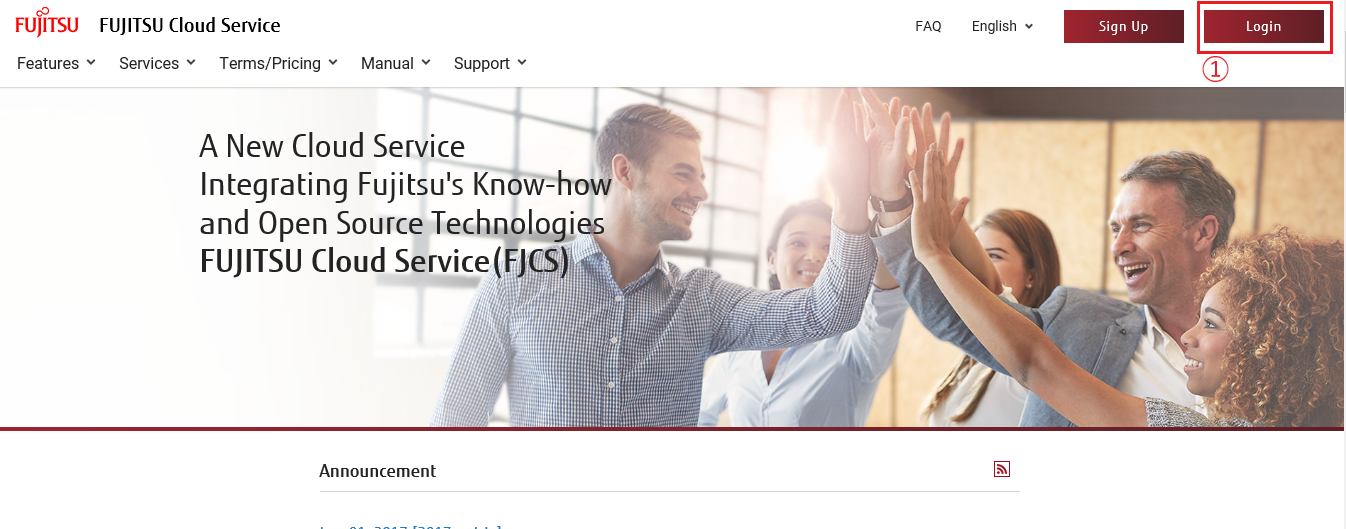
- On the [FJCS Portal] screen, click [Login] ① button.
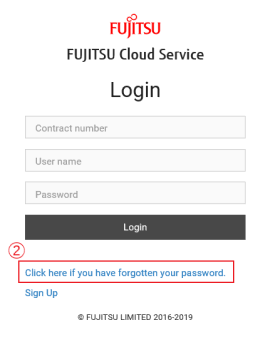
- On the [Login] screen, click [Click here if you have forgotten your password.] ②.
-
On the [Send E-mail for Resetting Your Password] screen, enter the Contract Number and User Name and click the [Send] button ③. To return to the [Login] screen, click the [Back] button ④. (*1)
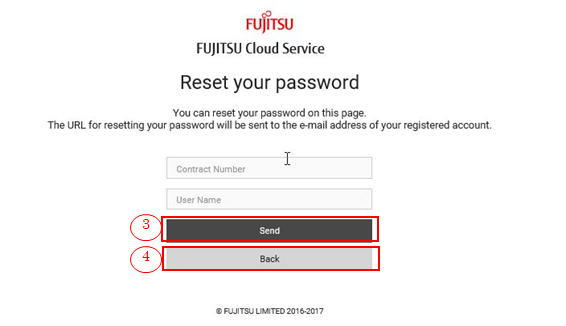
Item Name Explanation Contract number Enter the logged-in user's contract number. User name Enter the logged-in user's user name. *1 If you have not completed the application for starting FJCS, complete it before you proceed to reissuing your password.
-
A message is displayed on screen to show an e-mail has been successfully sent to your registered e-mail address to inform you of the URL for resetting your password.(*2)(*3)
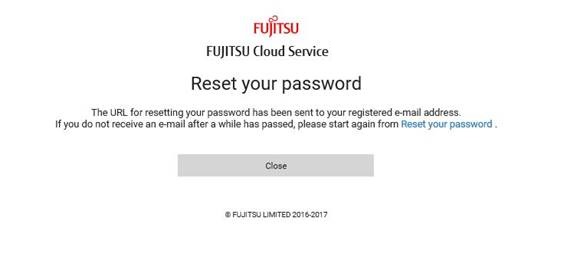
*2 Contact our help desk if an e-mail is not sent to your e-mail address.
*3 In the e-mail, User Name is masked out with characters. -
On the [Reset your password] screen, enter new password and click [Change] ⑤ button.(*4)
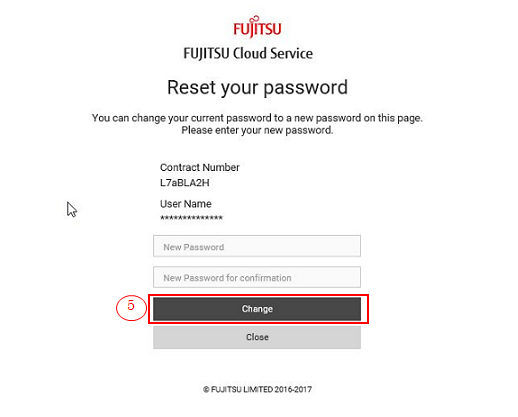
Item Name Explanation New Password Enter new password. New Password for confirmation Enter new password for confirmation. *4 If the role in FJCS portal is ‘User’ (Administrator or Developer), confirm that the User’s Status is ‘Enabled’ before you proceed to resetting your password.
6. A message is displayed on screen to show that your password has successfully been changed. Click [Login] ⑥ button and use your new password on the [Login] screen. (*5)(*6)
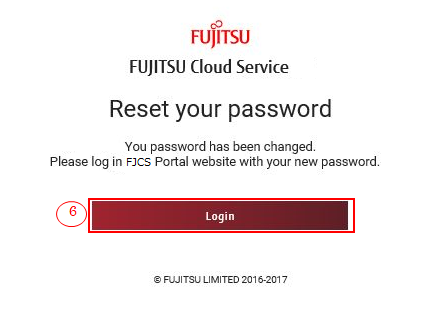
*5 If the password of a user account is updated, the token obtained before the update becomes invalid. Get a new token after the user's password has been changed.
*6 After your password has been changed, an e-mail to inform the password change will not be sent.
3.3.9 Secret code reissuing#
3.3.9.1 Reissue of secret code#
We will reissue a secret code for users of the service to perform one-time password authentication.
*Please note that reissuing the secret code will invalidate the current secret code.
Before Starting#
Log in as a user registered with the FJCS Portal.
Outline#
Follow the steps below to reissue the secret code of the logged-in user.
Procedure#
1.On the [FJCS Portal] screen, click [Change Authentication Method] (①) from the pull-down menu on the upper right.
2.On the [Change Authentication Method] screen, click the [Secret code] (②) button.
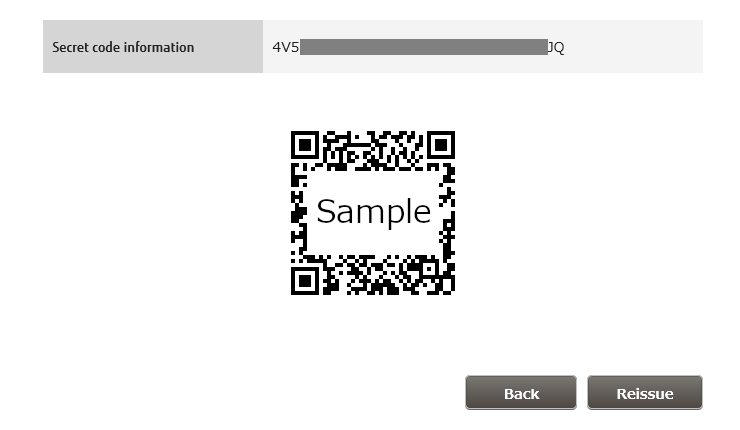
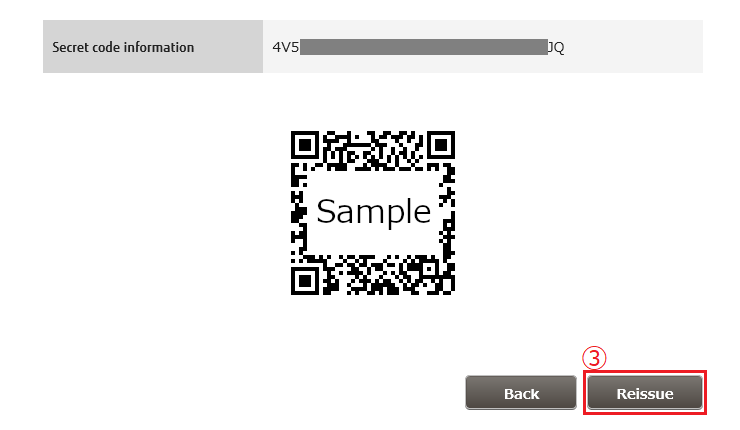
3.On the secret code screen, click the [Reissue] (③) button.
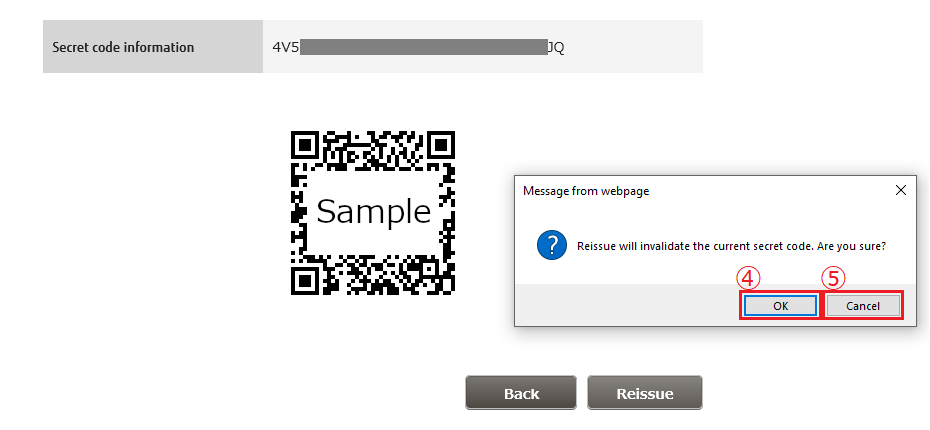
4.A confirmation dialog is displayed. To reissue, click [OK] (④). To cancel the reissue, click [Cancel] (⑤).
5.The secret code will be reissued and the secret code information and QR code will be displayed on the [Secret code] screen.
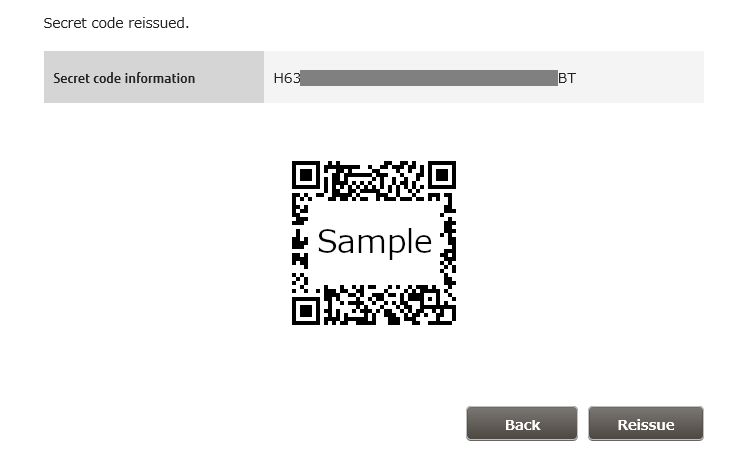
6.Set the reissued secret code in the two-step authentication app. Scan the QR code on the [Secret code] screen with the two-step authentication app, or enter the secret code information into thetwo-step authentication app to make the settings.